During the Winter Olympics earlier this year I participated in a knitting challenge on Ravelry.com called the Ravellenic Winter Games (yes, that’s spelled right, I checked it 3 times). Once upon a time it was called the Ravelry Olympics but the IOC, International Olympic Committee, threw a huge hissy fit over the use of the word Olympics. I understand their position, but damn, that was surprising to see the IOC be completely up in arms about a bunch of knitters. But I digress. I’m not even going to try to describe all the teams and events and medals and how it’s all run, but I participated on 3 teams. The 3 teams being “Team Knit Knack”, “Team No Spoons”, and “Team Vintage Knits” all of which I got to make avatars for, that was a whole lot of headache and fun put together. For each team I did one project and all 3 projects were sweaters. In the true spirit of the games, I really wanted to challenge myself and 3 sweaters in just over 2 weeks sounded like a big challenge, and oh boy was it ever!
First came the most important sweater for me, a RAINBOW BABY SWEATER. In protest of Vladimir Putins’ anti-gay propaganda bill, which punishes people for homosexual “propaganda” and imposes jail terms and fines on those who offend religious believers, a large group of knitters decided to knit in Rainbows. Oh those kooky knitters!
I giving this to a dear friend who just had an adorable baby boy. I’m still looking forward to a picture of the little bugger in it.
Second sweater on the needles was my MAUDE SWEATER. I had been wanting to make this one for a while but was waiting till I had the right yarn and the right motivation. Thanks to my mom and my sister I got some lovely Sunshine Luxury Sock yarn that would do very well. The color is called Lone Wolf and its a grey/beige color.
I did my research on this one and found that a lot of people were having problems with the pattern with sizing and pattern construction. Thankfully, enough people had taken great notes and worked out the kinks for me. I felt confident that I could get through it without too many problems.
I did make some alterations to the pattern. After the cast on ribbing I changed needle sizes to 3.5‘s instead of the recommended 3.75 as every thing I read said that the sweater runs VERY big in the lace section. This is also why I did a size small (I am by no means a size small). I worked 2 lace repeats then switched to the 3.75 just to make sure that it would fit over my big ta-ta’s. In hind sight, I didn’t need to do that. I also continued the button band all the way down the sweater because I really like the look of a cardigan.
Overall, I’m happy with how it turned out. The top lace part does pucker in the back which is not ideal and the neckband is very wide and doesn’t like to stay in place well but I’m brainstorming on ways to fix that. Considering I made a whole top with sock yarn involving sz.2 needles (think toothpicks) in less than 2 weeks, I think this was a win. And oh my golly, I have 2 more days to bust out one last sweater.
I’m calling this last one the GRAYSON PULLOVER. It’s a modified version of a generic baby sweater made with some sock yarn I was given last year for Xmas. It’s still waiting on a button for the top, but hey baby Grayson won’t be here for a few more weeks.
Wow, 3 sweaters on just over 2 weeks. Believe me, nothing else got done in that time. I think I did the dishes once and missed out on some social events and stayed up way too late a few nights, but I made it.
Here are my medals that I earned:
Monday, March 24, 2014
Saturday, March 1, 2014
A Cape full of Cables
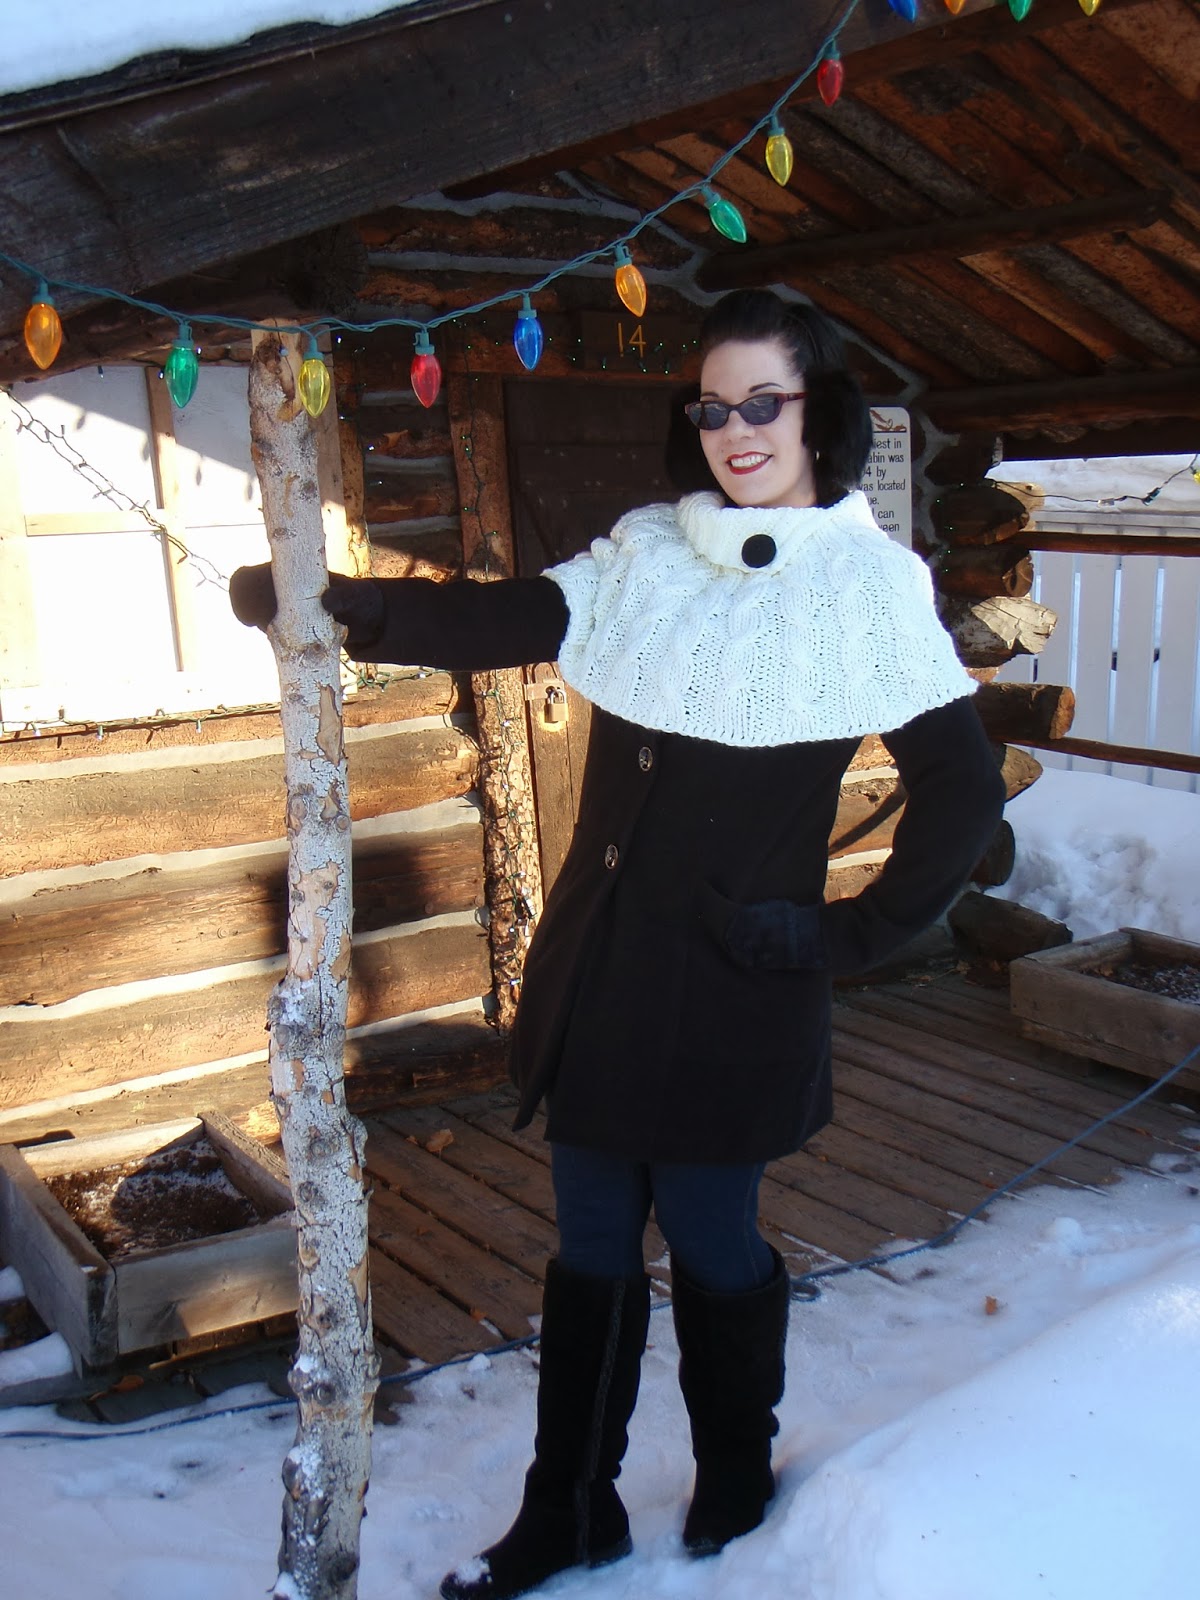
It's finally done. I've been working on publishing my knitting patterns for a while now but have not yet had the nerve to try to sell them. Well, I've finally done it. My first knitting pattern, "Amber's Cape" is now for sale HERE in my ravelry store. It's been a long project in the making. It all started with the idea to make something for my daughter for Christmas. I wanted something with cables in it, something in a bulky weight yarn (so that it didn't take forever to make) and needed to be something she could throw on with her already stylish wardrobe. I searched and searched for the right pattern, you know, that one pattern that looks exactly like the image you have in your head. Problem was, it just didn't exist. Or at least, not where I was looking. So, I thought I'd give it a try. So, here it is, and it looks just like it did in my head.
Next I had to test the pattern out. When I design something, I just start knitting and write down what I'm doing as I go. Then I type it up and cross my fingers that it makes sense. That's worked for me so far, but considering that this is the first pattern I'm trying to sell, I figured I should ask for help. All the thanks in the world to my mom for proof reading the pattern to make sure my abbreviations are correct and terminology and format make sense. She also test knit it for me. I think hers came out even better than mine did, but don't tell her that (lol).
Next step, put the whole project on the back burner for months waiting for the stars to align in order to get some decent pictures of the project. Really, schedules didn't match up, not enough day light, too cold, hangover (not mentioning who), and completely unrelated to the hangover cancelation, there was a Jameson issue in which the camera malfunctioned due to having Jameson spilled on it (again not mentioning who). Finally, on a particularly warm day, I grabbed the boyfriend and headed to Alaska Land to take some pictures. I'm very happy with how they came out. It was a fun way to spend the afternoon out in the sunshine with the boyfriend tromping around in the snow. Even if I did get my boots filled with snow.
Sure wish the ice cream shop was open though.
So, If your looking for something fun to knit and want to support a budding designer who's currently unemployed and needs money to buy more yarn, follow the link above and help a girl out.

Thursday, February 6, 2014
Ringing in the Knitting New Year
Recently I have received some wonderful yarn as gifts. Both my mother and sister have a great eye for luxury yarns and just love to buy them whenever possible. This always benefits me, especially around the holidays. With a birthday at the end of November, I consider it to be a part of the “holiday season” as well. This year I made out particularly well. For my birthday, my sister sent me a fabulous skein of MissBabs hand-dyed “Yummy” which is their sock/baby weight yarn in “Dark Oak” . This is an extremely rich very dark purple color. It’s almost black, but when looked at it under natural light, you can see the deep purple variation. Oh oh oh, what shall I make out of this??? Well, nothing for awhile. It was the holiday season and I had about a million other projects going on at one time. So, fast forward to Christmas, and I unwrapped an absolutely stunning skein of green sock yarn from Sunshine Yarns, sent to me by my mother. Just saying that this yarn is green is a horrible injustice to this yarn. The color is called “Jade” and it is such a happy summer green. Now, I wonder what this yarn will become?
At the end of the year a lot of people come up with New Year’s resolutions. I, instead, came up with a few Knitting New Year Resolutions. Three of my resolutions are: 1) Knit more from my stash, focusing on yarn that people have given me, 2) Learn at least one new technique, and 3) Document my knitting better. So, I wanted to start the new year off with a knitting bang. I need to find a project that fits as many of my resolutions as possible. I already have some wonderful new yarn in my stash, now I’d like to find a project I can make with that yarn, that I can learn a new technique with. In order to speed my knitting skills up, I decided, I would like to learn to knit Continental style. I’m an English style knitter or a “thrower”, meaning when I knit, I ‘throw’ the yarn around the needle - wrapped with the index finger of my right hand around the right needle after the stitch has been partially slipped from left to right. I’d like to learn how to be a “picker” which is the continental method where the yarn is ‘picked’ onto the right-hand needle from where it is held out in front of the left-needle. Over the many years I’ve been knitting, I’v been told that ‘picking’ is faster and less strenuous on your hands than ‘throwing’. This is because the hands/fingers are making much smaller movements. So, now I need to find a pattern that can use 2 different colors of sock yarn AND has lots of plain knitting, perfect for practicing a new knitting style. The idea of knitting a shawl seemed perfect, because when I’m done with it, I’ll have something beautiful to wrap around me that came from BOTH my mother and my sister. With the help of my mother, I decided on the pattern. Well, considering the pattern I ended up knitting was my mothers idea and she paid for the pattern, I don’t know that I actually decided on it. She did. But that’s okay with me. Anyways, lets get on with the show.
Here is my “Eagle Twist”, pattern written by Dennis Marquez. You can find it at my favorite online knitting community Ravelry.com. I did make some altercations to the pattern. Firstly, the pattern calls for a sport weight yarn but I was making it with sock weight. Because my yarn is finer, I thought I should also go with a smaller needle so instead of using US sz6, I opted to us US sz5 needles. Also, because I was afraid the end result was going to be a tiny scarf and not a shawl, I did a total of 7 sections of my contrasting color (the green) where the original pattern only called for 6. In the end......... IT’S HUGE!! It took up the whole bed! Haha, of course it is. I should have known that with my very loose gauge knitting (and continental knitting is usually even looser than English) just because I was using smaller needles and smaller yarn, I would be just fine. Anyways, it’s big, but not too big and I love it.
It's like a BIG hug from two people I don't get enough hugs from. Damn it for living so far away from them.
As far as learning a new technique went, well that didn’t go as smoothly as I’d have liked. I watched a few tutorials on continental knitting over at Youtube.com and gave it a go. It was uncomfortable at first, but got a little easier as I went along. The first few times I tried to purl in continental the stitches came out twisted so I decided I would just focus on the knitting and to keep the purling in english style. After the first few days my right hand was hurting some, due to all the new movements that my hand wasn’t used to. But that didn’t stop me, it just meant that I could work on it a little bit each day and be working on other projects at the same time. I’m ok with that. All and all, I learned how to knit, but not purl in continental and it is still sort of uncomfortable, but I think I’ll use this technique when I’m working other patterns that call for a lot of plain knitting. And someday I’ll learn to purl, as well.
I think that if I do this pattern again, there are a few things I would change. I would slip the first stitch in every row, this would make a much smoother edge. Also, I do not like the YO (yarn over) increases at the beginning and end of each row. I would do a different increase, either a KFB (knit front and back) or M1L/M1R (Make one Left/Make one Right). I think this would also look a bit smoother and not leave holes in the knitting. I considered changing the increases at the center cable but I believe that changing the YO’s would make the cable blend into the surrounding knitting. The holes that the YO’s create make the cable stand out. All in all I am very happy with the pattern.
Monday, January 20, 2014
Godwin Cloche
Over the last few months I’ve been working a lot on my knitting and my pattern designing. I’ve been making my own patterns for years but have not written them down. I have a history of taking someone elses pattern and using the idea behind it and then completely changing it to fit me and what I want. So now it’s time to change that. When I have an idea in my head of what I want to knit, I search around and see if it exists. Lately, I’ve found that my ideas aren’t out there, but that’s ok. I’m creative. One thing I have discovered is that I’m a much better knitter and designer than I am a photographer. This seems to be important when I’m preparing to put patterns out there for sale. Up until now all of my patterns (all 2 of them) have been available for free, but I’d like that to change. I have a couple of patterns in the works that I will need some wonderful photography of the objects in order to help sell the pattern. Thankfully, I have a friend Jackie Godwin, who has a side photography business. Because having a full-time job and working her way through nursing school isn’t enough to keep her busy, haha. Here is her Facebook page. So, I’ve propositioned her to help me out. I know her time and talent are worth a lot, but I’ve been out of work for almost 3 months now and funds are incredibly tight. I asked her if I could knit for her as payment and I’m so glad that she was happy to trade skills. Now, what to knit for her. I thought I’d like to make her a hat. I’m completely obsessed with making felted hats lately. A felted hat is knit with 100%wool much, much larger than it’s intended size. Then you wash it vigorously with extremely hot water until it shrinks down and all the fibers of the wool blend together to form a strong dense fabric that is very warm and sturdy. I love hand felting in my sink with the washboard. It is a little more work than machine felting, but I love the control that I have over the shrinking and shaping process. Yes, imagine that, me wanting to have control over everything. But what kind of hat would she like, there are so many different styles I could try to do. So I started searching around google for different style hat pictures and sent a bunch to her. She really liked the cloche style hats. Cloche hats, named after the French word for “bell”, were very popular in the 1920‘s and in to the early 30‘s, it literally is a fitted bell-shaped hat. I’ve made a few over the years and have never been truly happy with the way they have turned out. They are either too small, too big, the brim is too floppy, or there’s no brim at all. So, this sounds like a great opportunity to create my own pattern...... And so it began. I found the right yarn, one of my favorite yarns for felting “Patons, classic wool, worsted”, grabbed my knitting needles, my little blue pad of paper and a pencils then got to work. I’m not going to post the pattern here, as I have it published on Ravelry.com feel free to check it out. I welcome all comments and input anybody has.
So here it is. First, before felting. It’s huge, it fits completely over my head and the styrofoam head. Remember, I said you have to make it much bigger than intended so that it can shrink down.
And here is the finished “Godwin Cloche” named after the lovely lady it was designed for. See, I told you it would shrink! So far, she says she loves it. I’m so glad I had the opportunity to design and knit for a friend and publish yet another pattern. This is becoming quite the adventure.
Tuesday, January 7, 2014
Victory in Knitting
Over the last few months I've been in a group on Ravelry Knit for Victory and we've all been working hard on finishing our 1940's inspired knits. This was not my first sweater by any means, but it was my first sweater of this sort. Every sweater that I've made so far has been of a completely different construction type. Up to this point all the sweaters, cardigans, boleros, and tops I've done have been working form the top down, in one piece with raglan sleeves. This was the first time I had to work a top in pieces. First the back, then the front, then each sleeve. I've never seemed my knitting before, well not with any success anyways. I vaguely remember in the beginning of my knitting life doing a baby sweater with seaming that looked so horrible that I didn't even frog it, it just went strait into the trash. I was scared at first, well, and the whole way through, but it came out really well. Doing the set in sleeves was the scariest but after watching a half dozen tutorials on youtube I dove in head first. I firmly believe that if it weren't for youtube, I'd still be making garter stitch scarves. I'm a self taught knitter, or rather a youtube taught knitter, haha. Anyways, this was also the first "Vintage inspired" pattern that I've followed and true to vintage pattern form it was very vague. I'm used to having stitch counts when I have increases to make. I'm used to having row counts until there is a change in the pattern. I'm used to patterns that do the math for you when increasing or decreasing (Knit 8, inc 1, rep) not "increase 7 stitches evenly over next row" then I've got to figure out where to do them in the row. After completing the pattern, I'm not complaining. But I sure was complaining while doing it. In the end, it all worked out great. I was able to trust my knitting skills and now I know that I can to a sweater that is constructed in pieces. It's a wonderful feeling of accomplishment. The pattern is The Quick Knit 1940's style sweater , I altered the pattern on the front, I like a little deeper neck line, I also did some plain ribbing around the bottom of the body. I absolutely love the easy cable rib pattern and would have no problem making this sweater again. I think, if I do make another one, I'll make it just a bit longer and maybe put some plain ribbing on the end of the sleeves so that it matches the body.
I'm working on 2 new patterns right now. One is a Capelet with a staggering cable pattern, the other is a Herringbone stitch key-hole scarflet. I look forward to sharing them with you soon.
#knitforvictory
I'm working on 2 new patterns right now. One is a Capelet with a staggering cable pattern, the other is a Herringbone stitch key-hole scarflet. I look forward to sharing them with you soon.
#knitforvictory
Monday, December 30, 2013
Bandana Bow Tie
I've been involved with a knit-along, Knit for Victory on Ravelry.com and it has really inspired and motivated me. Not only have I been working on a 1940's inspired sweater (photo's and details at a later date), but I also created a new pattern for a head wrap inspired by the bandanas and turbans worn by the women of WWII as they were entering the factories and had to cover their hair so that it didn't get caught in the heavy machinery. This is my first time sharing a personal pattern. I hope you enjoy it.
Bandana Bow Tie
This cute little headband has a retro feel that knits up very quickly. Wear it with a high ponytail or use it to cover your pin-curls. You can alter the bow to be as big or little as you like and make one in any and every color to match your cutest poodle skirt or tightest peddle pushers.
Yarn - I used Dream in Color’s Bermuda Teal for the one in the pictures, but any worsted weight yarn will do.
Needle - Size 7
Abbreviations
RLI - Right Lifted Increase, Knit into the back of the stitch (in the “purl bump") in the row directly below the stitch on the left needle
LLI - Left Lifted Increase, Insert left needle into back of the stitch below stitch just knitted. Knit this stitch.
SSK - Slip, Slip, Knit
K2tog - Knit 2 stitches together
Psso - Pass slipped stitch over.
Co 7 stitches (From here and throughout pattern you will slip the first stitch of every row. On the odd rows, slip knitwise, on the even rows, slip purlwise.)
1) Sl 1st, P2, K1, P2, K1
2) Sl 1st, K2, P1, K2, P1
3) Sl 1st, P2, RLI, K1, LLI, P2, K1
4) and all even rows, work in pattern (knit the knit stitches, purl the purl stitches. Remember to slip the first stitch.
5) Sl1, P2 RLI, K3, LLI, P2, K1
7) Sl1, P2, RLI, K5, LLI, P2, K1
9) Sl1, P2, RLI, K7, LLI, P2, K1
11) Sl1, P2, RLI, K9, LLI, P2, K1
13) Sl1, P2, RLI, K11, LLI, P2, K1
15) Sl1, P2, RLI, K13, LLI, P2, K1
Continue in pattern without increasing (K the knits, P the Purls) until piece measures approx 17 in from CO edge. Or about 2 inches shorter than you want the final length to be, keep in mind you want it to stretch to fit your head. Starting on RS,
1)Sl1, P2, SSK, K11, K2tog, P2, K1
3)Sl1, P2, SSK, K9, K2tog, P2, K1
5) Sl1, P2, SSK, K7, K2tog, P2, K1
7) Sl1, P2, SSK, K5, K2tog, P2, K1
9) Sl1, P2, SSK, K3, K2tog, P2, K1
11) Sl1, P2, SSK, K1, K2tog, P2, K1
13) Sl1, P2, Sl1, K2tog, Psso, P2, K1
Bind off leaving a long tail. Sew ends of headband together still leaving end long. You will use this to attach the bow.
BOW
Co 8 st
1)Sl1, knit to end
2) Sl1, Purl to end.
Repeat these 2 rows till piece measures 8-9 inches, depending on the size of bow you want.
Bind off leaving a long tail to weave the ends together creating a loop. You should have both loose ends on one side. Tie them in a knot. Wrap ends in opposite directions around piece, a few times each to create the bow. Tie ends in a knot. Place bow on top of headband. Wrap the left over long ends around bow to secure in place. Tie another knot and weave in all ends.
Normally, I’m not one for blocking such small items, but this headband doesn’t like to lay flat so I recommend blocking this one.
Bandana Bow Tie
This cute little headband has a retro feel that knits up very quickly. Wear it with a high ponytail or use it to cover your pin-curls. You can alter the bow to be as big or little as you like and make one in any and every color to match your cutest poodle skirt or tightest peddle pushers.
Yarn - I used Dream in Color’s Bermuda Teal for the one in the pictures, but any worsted weight yarn will do.
Needle - Size 7
Abbreviations
RLI - Right Lifted Increase, Knit into the back of the stitch (in the “purl bump") in the row directly below the stitch on the left needle
LLI - Left Lifted Increase, Insert left needle into back of the stitch below stitch just knitted. Knit this stitch.
SSK - Slip, Slip, Knit
K2tog - Knit 2 stitches together
Psso - Pass slipped stitch over.
Co 7 stitches (From here and throughout pattern you will slip the first stitch of every row. On the odd rows, slip knitwise, on the even rows, slip purlwise.)
1) Sl 1st, P2, K1, P2, K1
2) Sl 1st, K2, P1, K2, P1
3) Sl 1st, P2, RLI, K1, LLI, P2, K1
4) and all even rows, work in pattern (knit the knit stitches, purl the purl stitches. Remember to slip the first stitch.
5) Sl1, P2 RLI, K3, LLI, P2, K1
7) Sl1, P2, RLI, K5, LLI, P2, K1
9) Sl1, P2, RLI, K7, LLI, P2, K1
11) Sl1, P2, RLI, K9, LLI, P2, K1
13) Sl1, P2, RLI, K11, LLI, P2, K1
15) Sl1, P2, RLI, K13, LLI, P2, K1
Continue in pattern without increasing (K the knits, P the Purls) until piece measures approx 17 in from CO edge. Or about 2 inches shorter than you want the final length to be, keep in mind you want it to stretch to fit your head. Starting on RS,
1)Sl1, P2, SSK, K11, K2tog, P2, K1
3)Sl1, P2, SSK, K9, K2tog, P2, K1
5) Sl1, P2, SSK, K7, K2tog, P2, K1
7) Sl1, P2, SSK, K5, K2tog, P2, K1
9) Sl1, P2, SSK, K3, K2tog, P2, K1
11) Sl1, P2, SSK, K1, K2tog, P2, K1
13) Sl1, P2, Sl1, K2tog, Psso, P2, K1
Bind off leaving a long tail. Sew ends of headband together still leaving end long. You will use this to attach the bow.
BOW
Co 8 st
1)Sl1, knit to end
2) Sl1, Purl to end.
Repeat these 2 rows till piece measures 8-9 inches, depending on the size of bow you want.
Bind off leaving a long tail to weave the ends together creating a loop. You should have both loose ends on one side. Tie them in a knot. Wrap ends in opposite directions around piece, a few times each to create the bow. Tie ends in a knot. Place bow on top of headband. Wrap the left over long ends around bow to secure in place. Tie another knot and weave in all ends.
Normally, I’m not one for blocking such small items, but this headband doesn’t like to lay flat so I recommend blocking this one.
Tuesday, December 17, 2013
She's back!!
To say that it's been awhile since my last post would be more than an understatement. In the last 3 years I've continued to work as a CNA (Certified Nurse Aid) in a long-term care facility, until recently when I herniated 2 discs in my back and had to have surgery. After being out of work for 2 months now and having spent the majority of that time knitting and crafting, I'm now reactivating my blog. I have also, in the last 3 years, finally beaten the "Boyfriend Sock Curse" he's been wearing hand knit socks for over a year now, and I don't think he's going anywhere any time soon. Together, we have become the proud parents of a lovely chihuahua named Cupcake. She is named after another hobby of mine. I love baking cupcakes, not cakes, not pies, not breads, just cupcakes. To me they are the perfect dessert, It's like having a whole cake all to yourself. I never was good at sharing......anyways. Here's to my new crafting and baking adventures.
Subscribe to:
Posts (Atom)